There is something so satisfying about embarking on a DIY journey and knowing that the delicious outcome is in your hands. Those of you who love to have that personal touch on your events {be it a bridal shower, wedding or birthday party} you'll adore these vintage award ribbon place cards. Thank you, Laurie Cinotto and Once Wed for passing the inspiration!

You'll need:
- Crepe paper (two or three colors, any thickness in a roll or folded pack)
- Decorative Paper
- Ribbon (1/2 inch wide, a simple, acetate florist ribbon works well for these)
- Glue gun and glue sticks
- Scissors (regular, pinking shears, or any decorative scissor)
- Stapler

Directions:
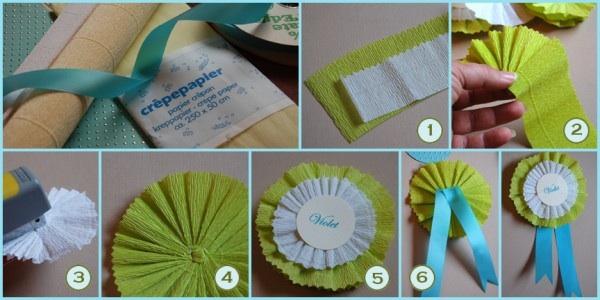
1. Begin by cutting a 2″ wide by 20″ long strip from your roll or folded pack of crepe paper. You’ll want the “grain” of the paper to run the short way. The bottom of your strip should be cut with standard scissors, but you can use any decorative scissors to cut the top edge. (See figure one)
2. If you are right handed, pick up the left end of your paper strip (straight edge at the bottom, ruffled edged on top) and begin folding small, angled pleats. Keep the completed pleats pinched between your left hand thumb and index finger as you work. Keep your pleats even.
If you’re left handed, start from the right end. Hold the completed pleats with your right thumb and index finger, fold with your left hand. (See figure 2)
3. Keep folding your angled pleats and a circle shape will naturally form.
4. When you have a complete circle, stop folding and trim any remaining paper.
5. Keep holding your medallion between your index finger and thumb. Take your plier stapler and carefully staple the center of the medallion. Turn the medallion 45 degrees, and staple again to create a “x” in the center. This should secure all the pleats. If, by chance, it doesn’t, it’s fine to add another staple or two. (See figure 3 and 4)
6. Cut another crepe paper strip approximately 1.5 inches high and 15 inches long. Repeat steps 2 through 5 to create a second, slightly smaller medallion. You can use the same color paper as you did for the first medallion, or you can chose a coordinating color.

7. When you have completed the second piece, put a dab of hot glue in the center of your larger medallion and place the smaller medallion on top of it.
8. Print your guests name on a sheet of card stock and cut out a circle with the name centered on it. Glue the circle in the middle of the smaller medallion. (See figure 5)
9. Cut two 4 – 5 inch lengths of ribbon. Snip a little triangle from one end of each ribbon.
10. Glue the ribbons to the center of the back side of the larger medallion. (finished ends dangling down). Cut a circle out of your decorative paper, ( smaller than the diameter of your largest medallion) and glue to the back. (See figure 6)
11. Place the ribbon medallions at each guest’s place setting, on their napkin, or attach to the backs of their chairs.
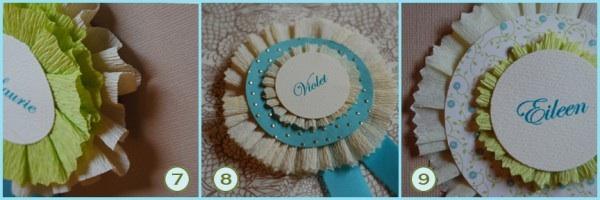
To make a more ruffly medallion, cut a extra long strip and begin making your pleats. When your circle is complete, go around it again and make a second row of pleats and then staple the center. (See figure 7)
Add decorative patterned papers between your medallion layers to add a little more color. (See figure 8 and 9)
*Photos courtesy of Once Wed
