Every lady needs one

Oh hey friends, happy Monday! Are you enjoying a nice little 3 day weekend in honor of Presidents Day? Well hopefully you're relaxing and too busy having fun to even bother blog-hopping, but in the event you're itching for something fun to fill your day with, we have something for you. Aside from the fact that it's engagement season and it would be a sweet gift, this DIY is just plain cute! Every lady needs a ring dish! I have one by the bathroom sink, one by the kitchen sink and one on my bedside table… because let's be honest, NO ONE wants to loose track of their pretty jewelry, diamonds or no diamonds. Anyway, this DIY looks super simple and I'm excited to give it a try!!

Check out Honestly WTF for the full play by play… and ENJOY the rest of your day off!!!

A Thanksgiving DIY: Watercolor Place Cards


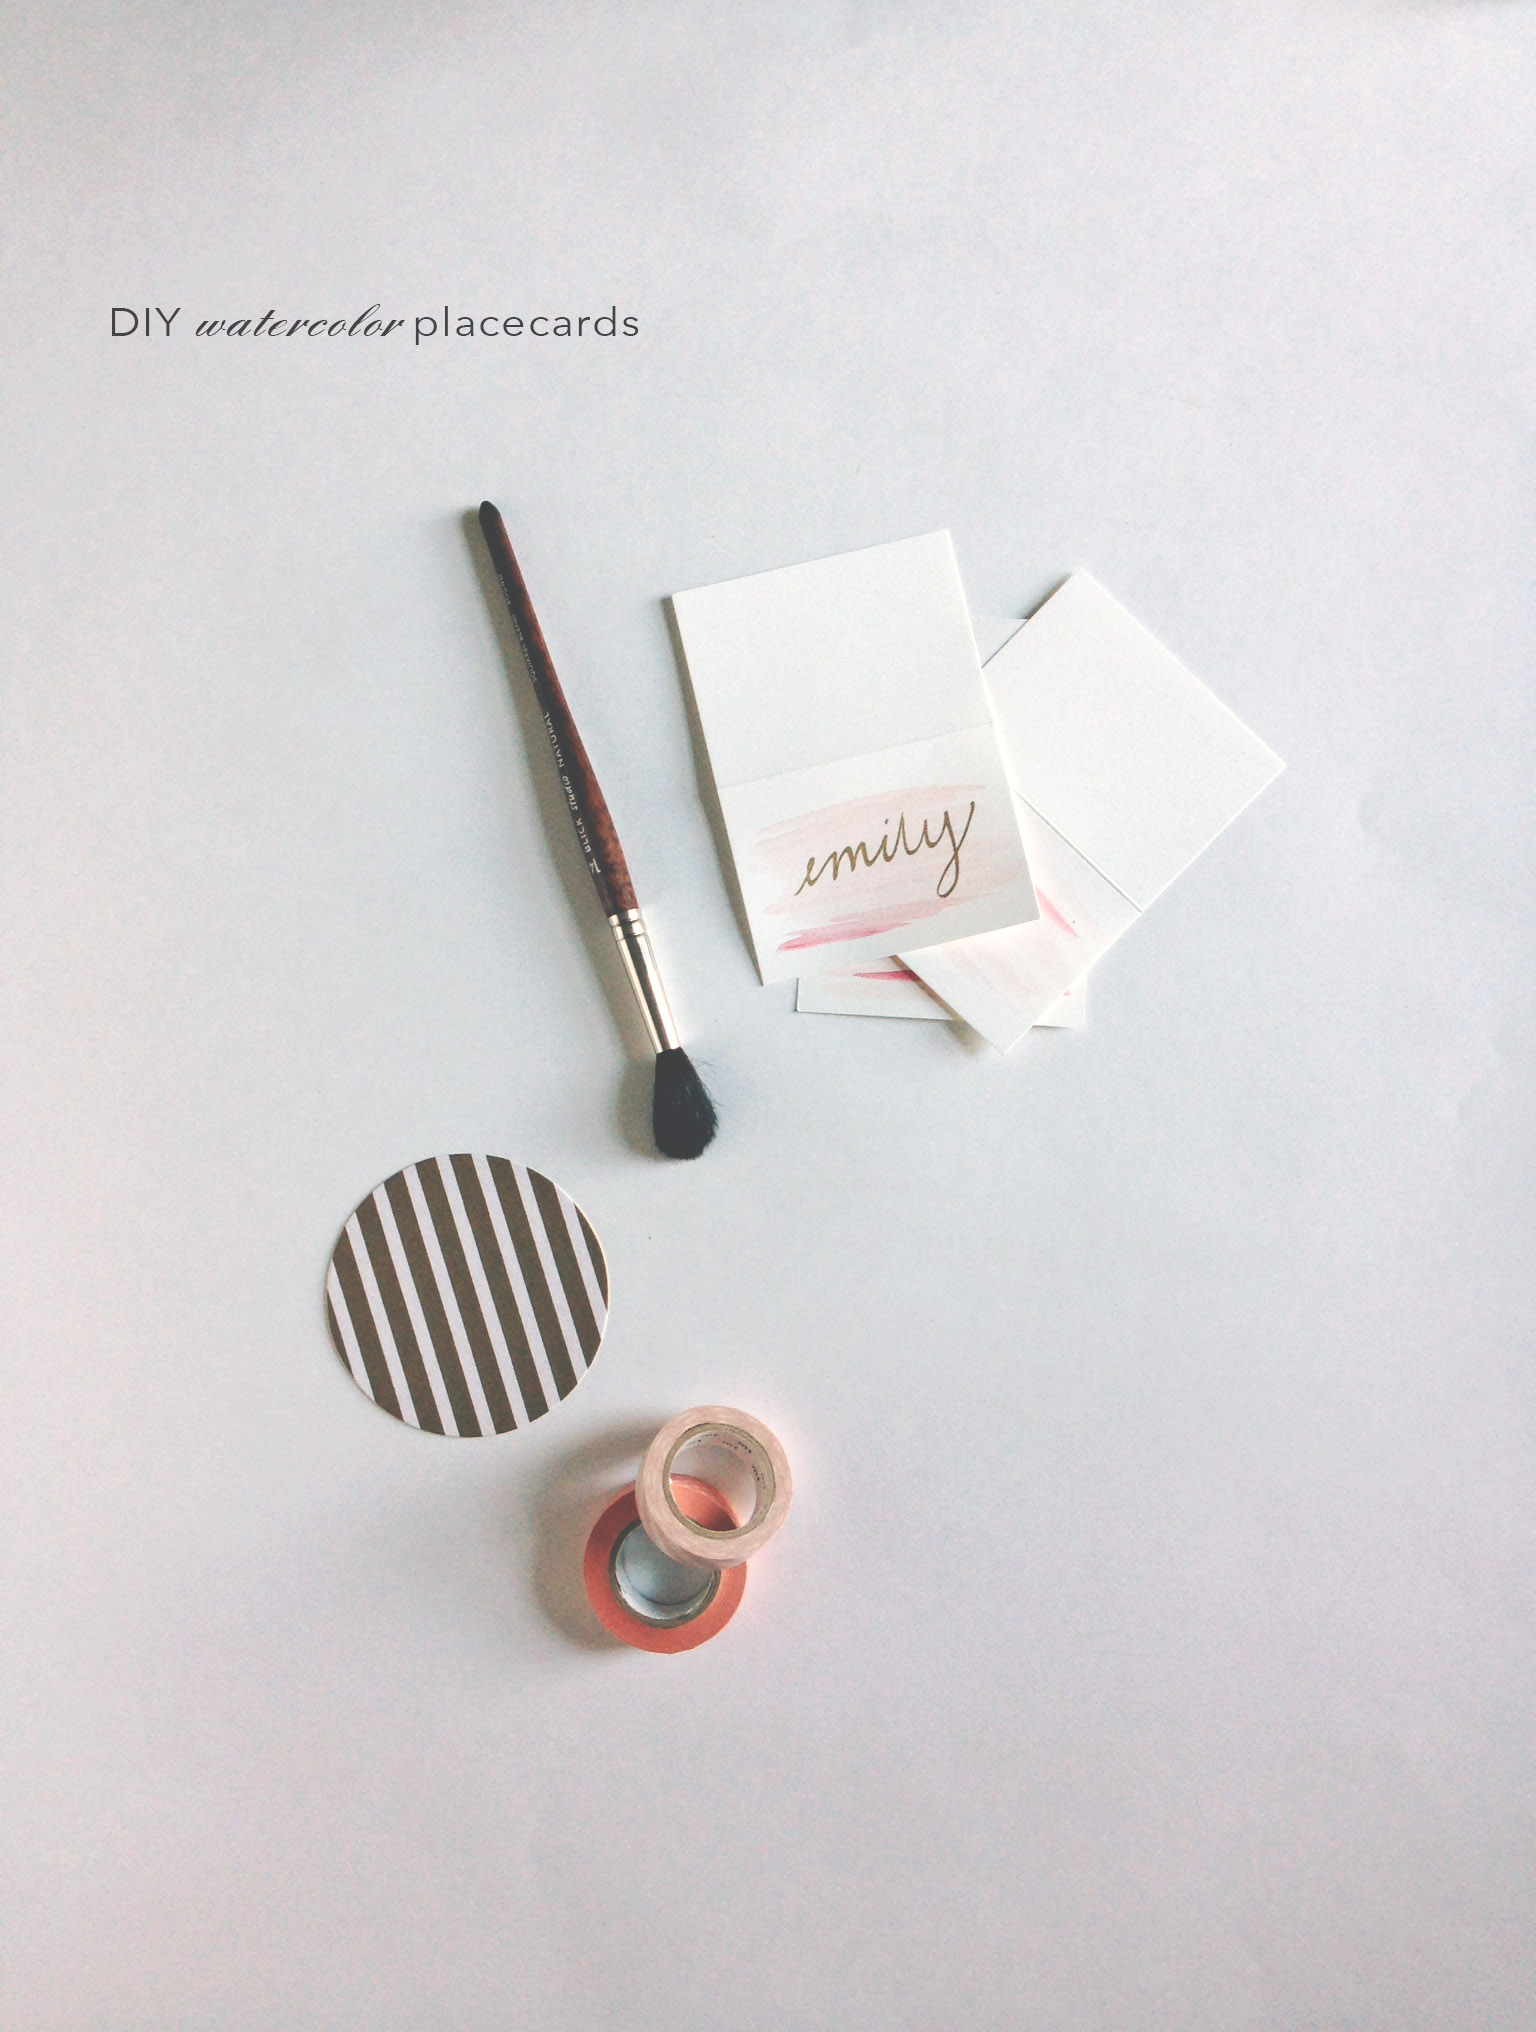
We have had a lot of fun in the office lately! Styling, brainstorming, painting...you name it! The creative juices have been flowing and we are loving it. Seeing as Thanksgiving is just around the corner (less than a week!) we wanted to get a little something together for you guys. These watercolor place cards are so sweet and festive- and as any DIY should be, simple.

All you need is:

watercolor brush (I used BLICK studio, 14)

maroon watercolor paint (or red/brown)

place cards (you can find these at Paper Source)

gold calligraphy paint pen

Instructions:

1. First, gather your supplies. Make sure to get plenty of place cards. You will want to practice, and have some backups in case of mistakes or misspellings!

2. If you can, work with these on an angled surface. It allows the paint to travel wherever the water goes, and it just makes painting easier!

3. Paint using different shades by varying the amount of water you use. Make sure to add a touch of a darker shade (less water) to the card.

4. When the cards are dry, use the gold calligraphy pen to write your guests names down on each card.

Other than that, these little guys are up to you! Practice makes perfect- have fun with it!


Happy Weekend!!

Happy Monday

For the last few weeks I've been searching high and low for the perfect cake platter for the big day... less then 2 weeks to go! Though we've landed on a decision, I'm totally kicking myself for not running into this adorable DIY glitter cake platter from the fabulous blog, Sugar & Cloth:

{via}

Studded Flats

If you've been following us for awhile, you might have seen how much we adored the trend of studded stilettos earlier this fall. Well, being more practical now that the chilly New England weather is upon us, we're digging on the more practical version: flats. We need shoes that will allow us to move a bit faster- into warm buildings. Truly, it's a little devastating when that time of year arrives. But alas, there are some adorable options out there for every budget!

{1} via; {2} via; {3} via

And if you're on a SUPER budget, I Spy DIY has a super easy way to refresh & update an existing pair of flats. Check it out... and then proceed to get lost on that blog, because it's full of fun ideas!!!

DIY: Pretty pumpkins

Hey friends! How was your weekend? Did you have a chance to do something super festive? In the midst of fighting off this darn cold, we took advantage of the gorgeous weather on Saturday and drove up north to explore Rockport. While the intention of this excursion wasn't to go leaf peeping, it was impossible not to be captivated by all of the firey colors that lined the highways and accented this cute little beach town. Fall in New England is simply the best. :) Now that some serious autumn inspiration was ignited over the weekend, it's time to tackle the first DIY of the season:

{via}

Completely adorable, right?! Get the "how-to" over on Twig & Thistle and spice up your fall decor! Happy crafting!

A little weekend project

Recently, we were brainstorming some unique escort card ideas with a client, and we came across these super cute textured pots over on Urban Comfort. How cute would these be for shower decorations, center pieces, or in our client's case, little pot holders for their planted herb escort-card-and-favor in one?! We think they're so stinkin' cute in fact, that this little project is going to make our weekend to-do list. Are you with us?!

{via}

Fancy Napkins

How was your weekend, lovelies? Being that springtime and sunshiny weather is the perfect time for housewarming parties, get-togethers and showers, we've been searching high and low for some fun ideas to spice up a table and here is one of our favorites that we stumbled upon...

{via}

I kid you NOT when I say that these napkins are actually a DIY. Can you believe it? I'm just dying to try my crafty little hands at these... which would equally make a perfect gift and a perfect addition any soiree. Hmmm...


DIY: Map Coasters

Oh hello and HAPPY Monday to you! In case you're fishing for some inspiration this week, we have quite the DIY to share! When we came across these adorable map coasters, we couldn't help but to think of several couples that we're working with right now who are quite travel savvy. These guys and gals have indeed shared some incredible adventures, all of which we think would be so fun captured in coaster form. :)

{via}


Vintage handkerchief inspiration

This Wedding Wednesday, we're pretty pumped to share some vintage hanky inspiration! This is such a fun way to incorporate lots of colors and patterns to achieve a soft, vintage elegant ambiance for the big day. These are super easy to find and can be very inexpensive too... antique shops, Goodwill, and {of course} Etsy will have a great variety. Let the inspiration begin with this adorable hanky garland that you can easily DIY...

{via}

This ring bearer pillow is adorable and would be super easy to make yourself to add another sentimental punch!

{via}

A hanky table runner?! If this isn't done at a wedding, this would be such a sweet idea for a shower or dinner with friends!

{via}

And although we're suckers for custom design, if you have your heart set on making your own Save the Dates, this idea we spotted on Wedding Chicks is pretty epic for a vintage wedding...

Get the DIY here...have fun!

Loving on lace

While perusing Style Me Pretty yesterday, this stunning Los Angeles wedding caused me to do a double triple take on one simple, inexpensive and AWESOME wedding decor idea.

These add the perfect amount of whimsy and vintage flair! And what a fabulous idea to place behind the dessert table! LOVE.

Upon further investigation, we've also fallen for the idea of mixing bright, fun fabrics in lieu of the lace, to add some pops of color! Get the DIY here, courtesy of Martha. Could you IMAGINE a slew of these hanging at the end of the aisle where your beloved is waiting on the big day? What a gorgeous frame to say "I do" in front of!

*Photos courtesy of Stephanie Williams Photography via Style Me Pretty

DIY: Perfect Pillows

Oh Monday, what shall we do with you? Oy, that was a rough game for those of us rooting for the Pats- did you catch it? This next week {at the least} will be a somber one in New England. What's better to cheer up the blues but a little crafting time? After recently coming to terms with the fact that I have major throw pillow obsession of mine in full force, I cast aside all cares and continue to crush on this spunky, customizable cushion that was originally spotted on Whit and Whistle.

OBSESSED. Can you imagine the possibilities? Quotes, a favorite Bible verse, a wedding vow...? Such a sentimental addition to any home and what a sweet gift this would be!!

Hot air balloon Heaven

I don't know about you, but I {Anna} have always wanted to go up in a hot air balloon. It just seems so romantic, breathtaking and adventurous- without seeming dangerous. While I've been saving this ride for a special occasion {what that might be, I have no idea}, I absolutely adore them as decorations. When I was researching fun ideas for incorporating these little guys into a baby shower for a dear friend, I just jumped for joy when I stumbled upon this DIY from Martha Stewart!

{via}

So yes, this is what I'll be doing this weekend: paper macheing, painting and decorating. YAY for a 3-day weekend! What sort of fun plans do you have in the works???

Letterpress Cookies?!

Yes friendies, it's true and oh-so-awesome. Needless to say, these Letterpress Chocolate Dipped Lemon Sugar Cookies have been calling our names. And, wouldn't they would be such an awesome party favor for a birthday?

{via}

Letterpress stamps {in both letters and numbers} can be found in a variety of places and in an array of fonts. Etsy is a great place to search and this shop is one of our faves. Remember that the letters & numbers need to look "backwards" when looking at the blocks in order for them to appear normal on the cookies.

Pretty stinkin' cute for a fancified sugar cookie, right?!

Wrappers Delight

After hours on end of fighting crowds and searching for the perfect gifts, relief washes over you and the hunt is finished. Now comes the fun part... wrapping! Yes, this is one of my personal favorite parts about giving a gift. It's like going to a nice restaurant and looking at the beautiful presentation of a dish that you're about to dig in to. It's an art. Each year I choose a color palette {yes this sounds a little crazy, but don't hate} and all of the gifts I give are wrapped to coordinate with each other. I just can't fathom how anyone could hate gift wrapping?! Since your shopping is done {or will be soon} we figured that now is the perfect time to share some super fun, funky & EASY ways to dress up those gifts!

1- Font Fun

2- Make your own bows

3- Brighten things up with yarn

4- Recycle old sheet music

5- Bakers twine + a cute tag

6- Use foreign newspaper

7- Bow alternatives

Hopefully this helps in your search for how to wrap and adorn those sweet gifts this year! Have fun with it and embrace the chance to decorate something other than trees & cookies!

Let it snow

Happy Monday! Maybe it's just me but I'm so excited for this week to get started! The weekend was delightfully fun, complete with an elegant belated birthday celebration with some dear friends {orchestrated by Emily} followed by lots of restful relaxation. Despite the non-traditional weather we've been having in New England these last few weeks, we can't deny that Christmas is going to be here before we know it! While it would be amazing for the snow to hold off for a few more weeks, it's been engrained in us to dream of a white Christmas. Well, to give the illusion of a white Christmas, I just love these little mason jar snow globes that I first spotted over at Anthropologie, but they're no longer available. Thankfully, those of us with a crafty side can partake in this sweet little DIY we found over on Kelly Moore's adorable blog.

If you dare, Do It Yourself... but we want to see pics of your festive holiday scene!!! Thank you Kelly, for the inspiration!

Happy Black Friday!

The day after Thanksgiving... while some people have been camping out in front of stores since yesterday and probably have their holiday shopping done, others have taken the equally festive route of busting out the Christmas decor and turning on the holiday tunes. How are you spending your day?? Historically we've been inclined to do the latter, but this year it sadly has to wait. In the interim, the ideas for decorating are stacking up and will likely be phased in gradually throughout the next couple of weeks. This easy to make + oh so chic holiday wreath may have to make an appearance on the front door this year...

{via}

If you're in search of some crafting for the weekend, check out the full tutorial over on the Two Junk Chix blog post! Happy Black Friday!

Fall Favorites: La Petite Coquin

Lena here from La Petite Coquin-I'm absolutely tickled to be guest blogging at Pearls for Paper today! Enjoying all this fall inspiration is enough to make a girl thirsty, but have no fear-your perfect autumn cocktail is here! I've been waiting for Whole Foods to open up their holiday table so I can get down to the business of ordering my Thanksgiving turkey, and to celebrate that free range bird I thought we could toast with a Cranberry Cobbler, a divine libation with plenty of fall flair!

Cranberry Cobbler serves 6 1 cup fresh or frozen cranberries 1 lemon, cut into wedges 1/2 orange, sliced into thin rounds 1 1/2 cups London dry gin 1/2 cup plus 1 Tbsp. off-dry Sherry 6 mint sprigs

Heat 1 cup of simple syrup almost to a boil, then reduce heat to medium. Add cranberries and simmer until they just being to burst; let cool.

Place two tablespoons of drained cranberries and 6 tablespoons of cranberry syrup in a large pitched; add lemon wedges and orange slices. Mash fruit, then add gin and Sherry. Let steep for 5 minutes.

Fill rocks glasses with crushed ice. Strain cocktail into medium pitcher, then shake with ice. Strain into prepared glasses, then mound with additional crushed ice.

Notes: While this recipe is a bit more labor intensive that my usual libations, it's well worth the effort. For a non-alcoholic version, skip the gin and sherry and serve the cranberry syrup and muddled fruit with club soda or sparkling cider. Cheers!

Recipe by Jim Meehan, Photograph by Levi Brown for Bon Appetit.

Fall Favorites: You Stir Me

Hi lovelies! I'm Laura from You Stir Me and I'm so happy to be visiting the gals at Pearls for Paper today and sharing a fun and easy DIY with you! This week is all about fall favorites and my absolute favorite thing to do this time of year is dream about all the prettiness in store for the holiday season. As soon as the first brisk fall morning peeks it's little nose around here, I instantly dive into all the holiday inspiration I've been squirreling away and have at it. Here's a little DIY I came up with, perfect for your Thanksgiving table or for those crafty brides out there wanting a homespun twist for their place cards. DIY Wreath Place Cards

You Will Need: A wreath (I used a vine wreath I had laying around but you can use a Styrofoam or cardboard one if you like!) Yarn Ribbon Glue gun Decorative accents Name Tag Scissors

Step 1: Tie one end of your yarn around the wreath and wrap the yarn all around the wreath. Tie it off when completed.

Step 2: With your glue gun, begin to glue the decorative accents to the wreath. I like to poke the ends of the accents into the wreath and hide them underneath the yarn. Be sneaky. Feel free to add as little or as much as you like! I was going to use the gold glitter ornament you see in the pictures but nixed it last minute. Editing down my crafts is not easy for me!

Step 3: Thread a piece of yarn through the name tag and tie it around the wreath. Loop your ribbon around the top, leaving the two ends untied. You'll use the ends to tie the wreath around your napkin.

Step 4: Place your wreath on your napkin and tie the ribbon ends behind the napkin. Sit back and enjoy!

Wouldn't it be such a fun idea if you made new Thanksgiving wreath place cards each year and everyone in your family started a collection of the wreaths over the years? You could hang them up on the Christmas tree or create a pretty garland to ring in the holiday season. Make sure to snip off the name tags, of course. Think of all the fun little things you could glue to the wreaths for a kids table!

My family might be seeing some little wreaths at their seats come Thanksgiving...

Branching Out

Hello fabulous friends! We hope you had a restful weekend. Our last few days were really quite incredible- for no reason in particular, other than simply realizing all of the blessings that surround us. It's such a beautifully refreshing and energizing feeling! So YAY MONDAY! BRING IT ON!!! We wanted to start you off with a SUPER simple and freaking adorable DIY from one of the designers at Fossil, that will start to set a festive mood in your home. All you need {as shown in 1 & 2} is:

- candle holders with flat sides {any size}

- craft adhesive {multi-purpose for wood and glass surfaces}

- garden pruners

- dry tree or shrub branches

As you can see it's pretty simple, but hop on over to the Fossil blog for the exact directions! What a fun way to make some unique, cozy Fall decorations!

*All photos courtesy of Fossil